- Ashwin Joseph
- July 6, 2021
Footwear defect detection using Vision Intelligence Systems
Across global industries, AI-driven computer vision systems are enabling the streamlining of the production process so that the products are compliant with the quality criteria set by the company. This in turn brings in advantages of greater efficiency, lower operational costs while enabling 24/7 production and quicker decision making.
Producing defect-free footwear is not easy. With a variety of defects to be recognized like excessive glue, weak bonds, scuff marks, asymmetry, size, metal contamination and sharp points, the time and effort for manual inspection keeps multiplying. Hence, the need for an automated defect detection system in the footwear industry.
This blog describes an application designed for defect detection in footwear raw materials using TYQ-i, Ignitarium’s Deep Learning based Vision Analytics Platform. The project was executed for one of India’s leading footwear manufacturing companies to cut down on the time taken for quality assurance, thus enhancing productivity and helping to digitise the process. The approach and apparatus took into account considerations like positional variance (placing the object in any alignment), various sizes of raw materials, lighting invariance, etc.
The approach taken by the Ignitarium Engineering team is detailed in subsequent sections:
- Dataset preparation
- Approach to solving the problem
- Labelling
- Training
- Accuracy
- Approach to using the application
- Application Screenshots
- Performance
- Conclusion
Dataset Preparation
In order to train a model, we must start with the appropriate amount of relevant data. For the footwear defect detection project, we were provided a variety of footwear raw materials samples of different types from our client’s production factories all over the country. A large dataset of images was generated by the team at Ignitarium by scanning the raw materials in different alignments. Here are some of the sample raw materials.

Approach to solving the problem
The approach to solving the problem involved using a combination of various image processing algorithms as well as Deep Learning detection algorithms using a special apparatus designed by Ignitarium. Firstly, using a scanner we were able to retrieve a high resolution colour image of the raw material, then using complex image processing techniques, various preprocessing steps were carried out to ensure positional alignment.
For knowing more about positional alignment, the following links will be quite helpful:
- https://learnopencv.com/image-alignment-ecc-in-opencv-c-python/
- https://opencv-python tutroals.readthedocs.io/en/latest/py_tutorials/py_imgproc/py_geometric_transformations/py_geometric_transformations.html
Deep learning was utilised for the automatic detection of cuts and holes in the raw materials. Semantic segmentation was used for the same and a number of architectures exist for the same like ParseNet, U-Net, etc. The following link will be helpful to gain more insights regarding the same.
U-Net consists of an encoder (downsampler) and decoder (upsampler). In order to learn robust features, and reduce the number of trainable parameters, a pretrained model can be used as the encoder. Thus, the encoder for this task can be a pretrained model like MobileNetV2, whose intermediate outputs will be used, and the decoder will be the upsample block.
Unet Model
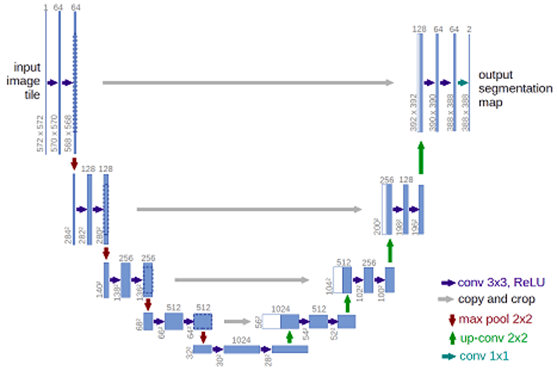
[Source: https://raw.githubusercontent.com/zhixuhao/unet/master/img/u-net-architecture.png]
The following links are helpful for exploring about Unet:
TensorRT optimization
Inorder to speed up the inference results we had carried out TensorRT optimization on our models. TensorRT is an Nvidia software solution for generating optimized models for production deployment of Deep Learning Models. This is achieved by restructuring the graph to perform the operations much faster and more efficiently without changes to the underlying computation in the graph. Detailed information on TensorRT can be found here.
Labelling
Labelling is an important part of any ML-based system. Ignitarium used its own in-house labelling application for the annotation tasks involved in identification of cuts along the footwear raw materials, thus generating the corresponding mask images for the images scanned.
Training
Using the mask images obtained from the inhouse labelling application and the original scan images, training was carried out. Several pretrained encoder-decoder networks like resnet50_segnet, mobilenet_unet, resnet50_unet etc. are available that can be used based on the requirement.
Accuracy
Our custom semantic segmentation network was able to correctly identify the cuts in the raw materials with an accuracy of over 98%.
Approach to using the application
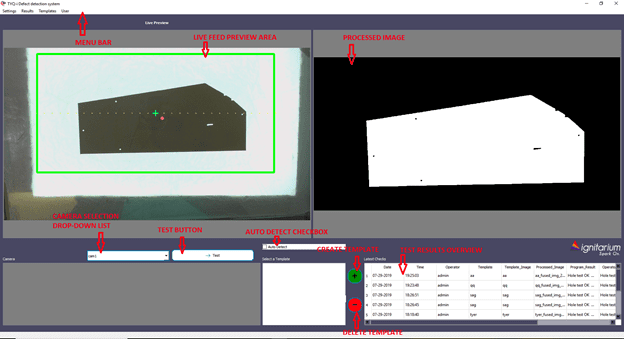
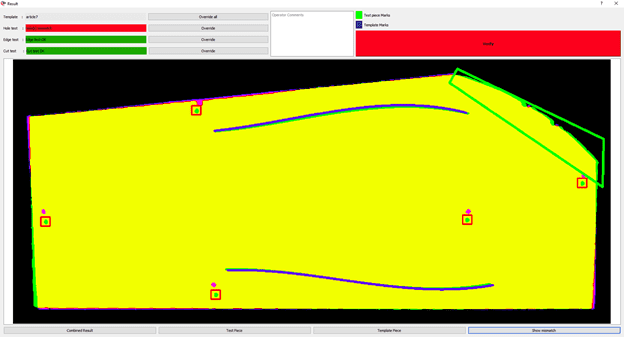
The application requires the user to store templates of each type of raw material they intend to test. It is a one time process for each template. The template creation process involves selecting the positions of holes and drawing the positions of cuts with a mouse pointer as well as marking specific regions that may require custom threshold as compared to other regions as well as entering other details regarding the template like size, article number, left or right orientation etc.
Application Snapshots
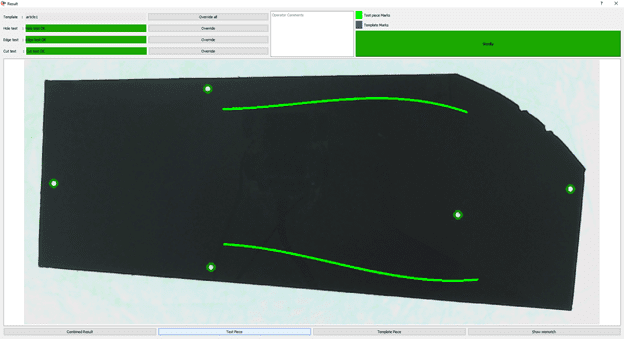
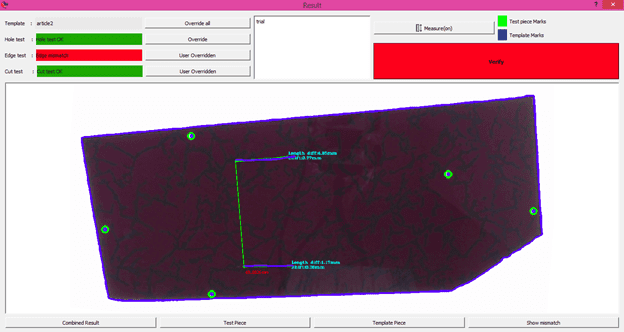
Here are some of the snapshots of the application:
Performance
Scanner’s processing time can vary with resolution used; for the specific scanner used, the total time taken for testing is around 35-40 seconds including scanning and generation of results. Normally the same process when carried out manually by a person, would be highly laborious requiring the verification of dimensions with instruments and visual inspection of raw piece with a template piece, that could take upto 3-4 minutes a piece.
Conclusion
Video explaining the features of the product is available in the following link:
Salient Features of the Footwear Defect Detection Application:
1) Identification of standard defects namely position of holes, cuts as well as outer surface shape of test pieces utilising Deep Learning and Image Processing techniques.
2) Mark custom regions in templates that are to be evaluated against custom tolerance values. Can be utilized in cases where certain regions in the template are to be given more or less prominence.
3) Ability to use CAD files as well as Scanner Feed as Input.
4) Automatic Template Detection feature for identification of corresponding article, if previously stored, thus removing the need for manual selection by the user.
5) Search option for searching for templates based on article names.
6) Folder Structure for neatly organising Article Templates of different sizes
7) Re-orientation of test piece with respect to template either using shape matching or hole position of corresponding template.
8) Availability of different views after testing the Template to make the user understand visually the exact points of defects, if any.
9) Ability to Store and retrieve details from the Result Database regarding tests carried out with various filtering options.
10) Easy modification/ deletion of templates by privileged users.
11) Ability to assign custom privileges to different users of the application like Template Creation/ Modification, Create a new User and Test Analysis Overview.
12) Ability to specify custom tolerance values in the SI metric system for various dimensions taken into consideration for testing for each type of template.
13) Mandate the user to enter certain details like batch number and explanation if results generated by the application were overridden, all which will be stored in the database.
14) Export of report database details into Spreadsheet and PDF formats for Report generation. The details to be included can be controlled using filtering options
15) Ability to Import or Export Template Database.












1 thought on “Footwear defect detection using Vision Intelligence Systems”
I don’t think the title of your article matches the content lol. Just kidding, mainly because I had some doubts after reading the article.