- Pavan Kumar
- August 24, 2021
GitLab for beginners
Let’s dive into Part 3 of the blog series ‘Getting Started with Git’. In this blog, we will explore the basics of GitLab. A few fundamentals of GitLab that will be covered are:
- Creating a project and cloning it
- Creating branches, making changes and pushing back to GitLab
Creating a Project and cloning it
You can create a GitLab account yourself or you can request your IT team (if working in an organization) to create one for you. If, like me, you got the IT team to create it for you, all you need to do is visit the URL of your company’s gitlab account and login with your credentials. In my case, clicking on the Ignitarium logo directs me to a page which looks something like this. A new user does not see any Projects in this listing. Since I have already worked on a few projects, those are listed here.

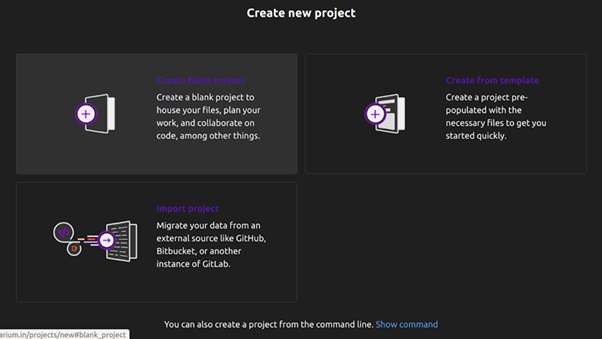
Now click on . You will be directed to a page which looks like this.

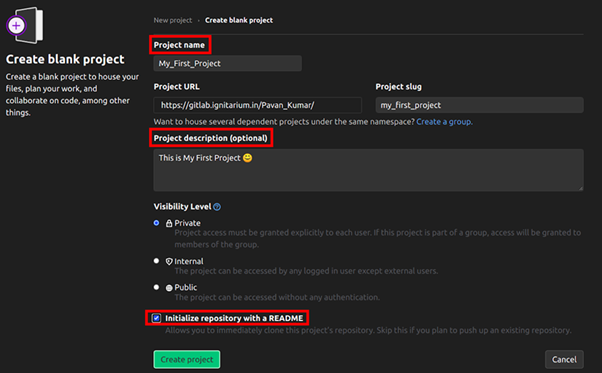
When you click on Create blank project, you’ll be directed to a page looks like this

You can then add basic project information:
- Project name
- Project description
- Check on Initialize repository with a README.
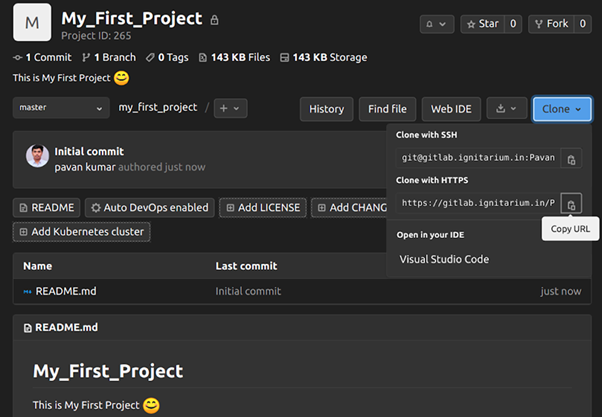
Then upon clicking , you’ll be directed to a page which looks like this

Let’s clone it into our local repository and make some changes in it. In order to clone this project (same as GitHub), we need to copy this https code and use it along with the ‘git clone’ command in our terminal.

Creating branches, making changes and pushing back to GitLab
To clone the repo using https link.
To open a cloned directory and to check number of branches in it
To create a new branch and check whether it’s created (or) not.
Here we are switching from master branch to new_branch and checking whether the switching happened successfully or not
Here, we have created an addme.py file in the current repo and are listing all the directories and files in the current repo and checking the status of repo.
Here we are adding the addme.py file into the staging part and checking the status
Once we add the files into staging, we need to commit it to the local repository. For that we used the help of ‘git commit’, where -m is used to type a message for committing the changes.
Not a Mandatory stepHere we’re merging the new_branch with master branch.
Finally we are pushing it back to GitLab.
As a result we can see that a new file (addme.py) is added into GitLab.
Summarizing ‘Getting Started with GitLab’
In this blog we have seen:
- How to create an empty project in GitLab.
- How to clone it to your local working directory
- How to create a new branch and add files into that branch
- How to merge it with the master branch and finally
- How to push it to GitLab.
Hence we are winding up our series Getting Started with Git with Getting Started with GitLab hope you enjoyed this final blog.
For the first two blogs in this series, you can visit the below two blog pages:


Comments are closed.